Skip to content



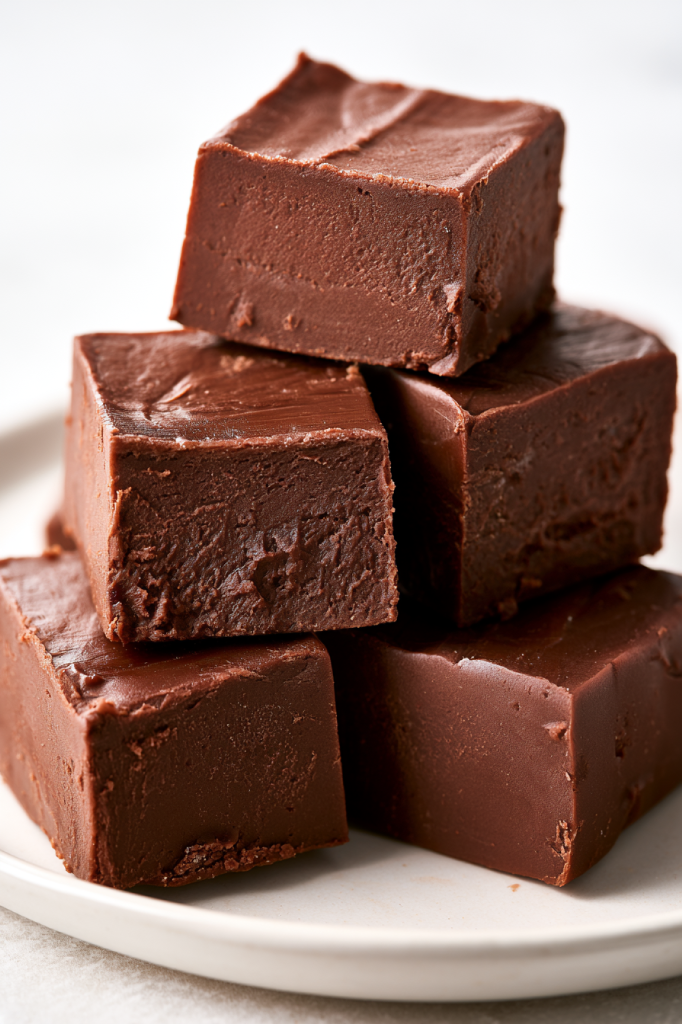
There’s something special about making fudge the traditional way.
A saucepan bubbling gently on the stove, the unmistakable aroma of cocoa filling the kitchen,
and the anticipation of watching the mixture transform into smooth,
sliceable candy all make this recipe feel like a little kitchen project worth slowing down for.
This isn’t a shortcut fudge made with sweetened condensed milk. Instead, sugar, cocoa, milk, butter,
and vanilla are cooked to a precise temperature, then cooled and beaten until the mixture develops that characteristic old-fashioned texture.
The finished fudge is rich and chocolatey with just the right amount of crumble, while still having that lovely melt-in-your-mouth quality.
If classic homemade candy is your kind of treat, this is a recipe worth keeping close. Make a batch for a holiday dessert table, wrap the pieces up as a homemade gift, or keep a few squares tucked away for an afternoon chocolate craving.
Why You’ll Love This Recipe
This fudge has the texture that makes traditional candy so satisfying. It’s not overly soft or sticky, and it doesn’t depend on a long list of ingredients or complicated decorations.
The recipe uses only six ingredients, but the cooking technique is what gives it character. Reaching the correct temperature, allowing the mixture to cool properly, and beating it at the right stage all work together to create the finished texture.
It’s also wonderfully versatile. Once you have the basic chocolate fudge down, you can add toasted nuts, peanut butter, peppermint, dried cranberries, or other favorite flavors to make it your own.
For Old-Fashioned Chocolate Fudge
- Granulated Sugar – this provides the sweetness and forms the base of the fudge as it cooks and sets.
- Cocoa – use unsweetened Dutch-processed cocoa for a deep chocolate flavor and rich color.
- Salt – a small amount helps balance the sweetness and bring out the chocolate flavor.
- Whole Milk – gives the fudge the liquid it needs while adding richness and helping create its classic texture.
- Butter – I use salted butter at room temperature. It adds richness and helps give the finished fudge a smooth, tender texture.
- Vanilla – just a little vanilla rounds out the chocolate flavor and adds extra depth.
Step-by-Step Instructions
Step 1, Start with the pan
Begin by lining an 8 inch square pan with buttered parchment paper. Having the pan ready before you start cooking is important because the fudge needs to be transferred quickly once it reaches the proper stage.
Step 2, Combine the fudge mixture
In a medium heavy saucepan stir together sugar, cocoa and salt, then add the milk and stir with a wooden spoon (not a whisk or metal spoon).
Step 3, Cook the mixture
Cook over medium heat stirring continuously until mixture starts to boil (a strong boil), approximately 15 minutes.
Step 4, Reach the target temperature
Turn heat to low medium and continue to cook without stirring until temperature reaches 234 °F (112C) Approximately 30 minutes.
This is the stage where a dependable candy thermometer becomes especially useful. Traditional fudge relies heavily on temperature, so don’t try to estimate the finished stage by appearance alone.
Step 5, Cool and beat
Remove pot from heat, add the butter and vanilla. Do not stir. Cool to room temperature (110°F/43C), approximately 30 minutes. Then beat with a wooden spoon just until mixture begins to lose some of it’s gloss (approximately 6-8 minutes).
Step 6, Transfer and let it set
Then spread quickly in prepared cake pan and let cool completely, even overnight (at room temperature). Cut into squares. Store in an airtight container at room temperature.
Step 7, Freeze for later
You can also freeze the fudge in a double bag, well wrapped. Freeze either in pieces or the whole slab. Can be frozen up to 3 months. Keeps in an airtight container for approximately 2 weeks or in the fridge for 3-4 weeks. Enjoy!

What are the mistakes to avoid while making this Old-Fashioned Chocolate Fudge to get the best results ?
Keep your candy thermometer close.
The final texture depends heavily on reaching the correct temperature. A reliable thermometer makes this step much easier and more consistent.
Have everything ready before cooking.
Prepare the pan and gather your ingredients before you begin. Once the fudge has been beaten, you’ll want to spread it into the pan without delay.
Don’t stir when the recipe says not to.
The second cooking stage is specifically done without stirring. Follow the temperature and timing closely rather than trying to speed things along.
Give the fudge enough cooling time.
The mixture needs to cool to 110°F/43C before beating. This isn’t a step to rush.
Watch the consistency while beating.
The goal is for the mixture to begin losing its glossy appearance. Once it reaches that point, spread it into the prepared pan promptly.
Make it on a dry day when possible.
Humidity can affect homemade candy and may leave the finished fudge softer than expected.
Recipe Variations
Once you’ve mastered the basic chocolate fudge, there are plenty of ways to change the flavor.
Nutty Chocolate Fudge: Add walnuts, hazelnuts, pecans, or pistachios. Toast the nuts first for a deeper flavor.
Peanut Butter Fudge: Add peanut butter along with the butter and vanilla.
Peppermint Fudge: Replace the vanilla extract with peppermint extract for a festive chocolate-mint version.
Chocolate Orange Fudge: Use orange extract instead of vanilla for a bright citrus note.
Almond Fudge: Swap the vanilla for almond extract.
Holiday Fudge: Add mini marshmallows, dried cranberries, or broken candy canes for a seasonal twist.

Recipe FAQs
1. Why is my fudge grainy instead of smooth?
This usually happens when the sugar crystallizes too much during cooking. Make sure the sugar dissolves properly, avoid stirring during the second cooking stage, and wait until the fudge cools to 110°F (43°C) before beating. These little details make a big difference in getting that classic smooth, slightly crumbly texture.
2. Do I really need a candy thermometer?
I definitely recommend using one for this recipe. Fudge is all about reaching the right temperature, and the mixture needs to reach 234°F (112°C) before you take it off the heat. A reliable candy thermometer takes the guesswork out and helps you get the texture just right.
3. Why is my fudge too soft?
This usually means the fudge didn’t reach the proper temperature while cooking. Make sure the mixture reaches 234°F (112°C) before removing it from the heat. It’s also worth checking that your candy thermometer is accurate, since even a small temperature difference can affect how the fudge sets.
4. Can I make this fudge at high altitude?
Yes, you can, but you’ll need to adjust the cooking temperature. For every 1,000 feet above sea level, deduct 2°F from the recipe temperature. For example, if you’re at 5,000 feet, you would cook the fudge to 224°F instead of 234°F.
5. How do I know when the fudge is ready to spread?
Once the fudge has cooled to 110°F (43°C), beat it with a wooden spoon until it starts to lose some of its glossy appearance. This is the point when you want to spread it into the prepared pan. Don’t wait too long, because the fudge will continue to firm up as it cools.

Old-Fashioned Chocolate Fudge
Ingredients
- 3 cups granulated sugar
- 2/3 cup cocoa (unsweetened dutch processed)
- 1/8 tsp salt
- 1 1/2 cup whole milk
- 1/4 cup butter* (I use salted) (room temperature) *if you use unsalted butter then increase the salt to 1/4 teaspoon.
- 1 tsp vanilla
Instructions
- Line an 8 inch square pan with buttered parchment paper.
- In a medium heavy saucepan stir together sugar, cocoa and salt, then add the milk and stir with a wooden spoon (not a whisk or metal spoon).
- Cook over medium heat stirring continuously until mixture starts to boil (a strong boil), approximately 15 minutes.
- Turn heat to low medium and continue to cook without stirring until temperature reaches 234 °F (112C) Approximately 30 minutes.
- Remove pot from heat, add the butter and vanilla. Do not stir. Cool to room temperature (110°F/43C), approximately 30 minutes. Then beat with a wooden spoon just until mixture begins to lose some of it's gloss (approximately 6-8 minutes).
- Then spread quickly in prepared cake pan and let cool completely, even overnight (at room temperature). Cut into squares. Store in an airtight container at room temperature.
- You can also freeze the fudge in a double bag, well wrapped. Freeze either in pieces or the whole slab. Can be frozen up to 3 months. Keeps in an airtight container for approximately 2 weeks or in the fridge for 3-4 weeks. Enjoy!
.
Recipe Notes
Nutrition
Calories: 155kcal | Carbohydrates: 32g | Protein: 1g | Fat: 3g | Saturated Fat: 2g | Cholesterol: 8mg | Sodium: 43mg | Potassium: 65mg | Fiber: 1g | Sugar: 31g | Vitamin A: 100IU | Vitamin C: 0mg | Calcium: 22mg | Iron: 0.3mgStorage & Reheating
Room Temperature
Wrap the cut pieces in parchment paper or aluminum foil and store them in an airtight container or sealable plastic bag. Fudged stored at room temperature can last from 7 – 14 days.
Refrigerator
Fudge can also be stored in the refrigerator wrapped and placed in an airtight container. In the fridge fudge will last 2 – 3 weeks.
Freezer
Freeze the fudge in a double bag, well wrapped. You can freeze it either in pieces or the whole slab. Fudge will keep for up to 3 months in the freezer.
For serving after refrigeration or freezing, allow the fudge to come back toward room temperature before enjoying so the texture becomes softer and more pleasant.
Serving Suggestions
A square or two is all this rich fudge needs alongside a cup of coffee or tea.
For an extra-indulgent dessert, chop the fudge into small pieces and scatter them over vanilla ice cream. You can also gently melt the fudge and use it as a warm chocolate topping.
Another fun option is to stir pieces into hot milk until smooth for an intensely chocolatey drink.
And because the pieces hold their shape so well, this fudge makes a lovely homemade gift. Arrange the squares in a small box, wrap them individually, or serve them on a dessert platter during the holidays.
A Note on High-Altitude Baking
If you live at a higher elevation, the cooking temperature needs to be adjusted. Deduct two degrees from the temperature required for every one thousand feet of altitude above sea level.
For example, if you live 5,000 feet above sea level, you would deduct 10 degrees from 234 degrees.
How to Keep Fudge From Becoming Grainy ?
The texture of traditional fudge depends on controlling sugar crystallization. Make sure the sugar dissolves properly, avoid unnecessary stirring during the cooking stage, and beat the cooled mixture according to the recipe.
If the fudge is too soft, the mixture may not have reached the required temperature during cooking. This is another reason a good candy thermometer is so useful.
How to Roast Nuts for Fudge ?
Place nuts in a single layer on an ungreased baking / cookie sheet. Bake in a pre-heated 350F/180C oven for 5 to 8 minutes or until they are golden brown, remove immediately from the pan to a clean bowl to cool.

You May Also Love
From cozy classics to indulgent new favorites, these are the desserts our readers can’t stop making!
The Ultimate Chocolate Chip Cookie Recipe
Quick and Easy Cinnamon Swirl Bread Recipe
The Ultimate Lemon Sugar Cookies
Soft & Chewy Snickerdoodle Cookies
Brown Butter Brown Sugar Cookies