Skip to content

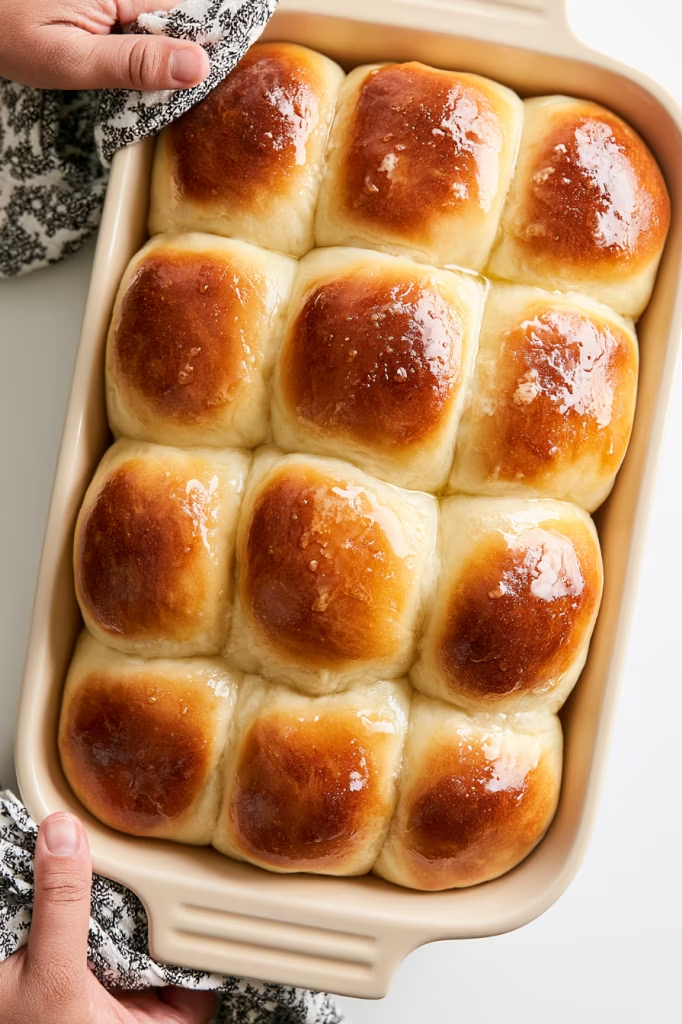
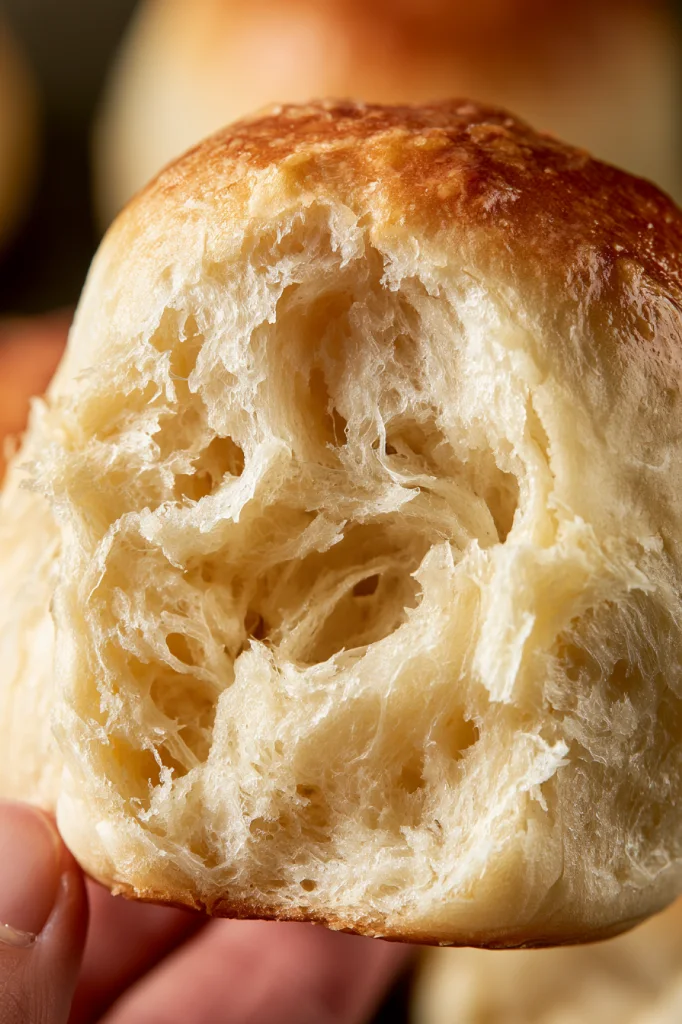
Warm from the oven and brushed with melted butter, these homemade dinner rolls are the kind of bread that makes a simple dinner feel a little more special.
They’re soft in the middle, beautifully golden on top, and just sweet enough to keep you reaching for another.
I especially love that making them doesn’t have to become an all-day baking project.
The dough gets two short 30-minute rises, and a stand mixer handles most of the kneading.
Once the rolls are shaped and tucked together on the pan, all that’s left is to let them puff up and bake until golden.
Serve them straight from the oven with dinner, set them out for a holiday meal, or save a few for sandwiches the next day. That warm, buttery top and fluffy center make them welcome at just about any table.
Why You’ll Love This Recipe
There’s a lot to love about a basket of freshly baked rolls, but the texture is what really makes this recipe worth making. The centers stay wonderfully soft and fluffy, while the tops turn lightly golden in the oven. A final brush of melted butter gives them an extra-soft, glossy finish.
They’re also surprisingly approachable for homemade yeast bread. Rapid rise yeast keeps things moving, the stand mixer does the hard work, and each rise is just 30 minutes. And because the recipe makes 24 rolls, there are plenty for a family dinner or a big holiday table.
Dinner Roll Ingredients
- All-Purpose Flour – This gives the rolls their structure while keeping the centers soft and fluffy. Since the recipe calls for 4–5 cups, add the extra flour only as needed so the dough doesn’t become too dry.
- Rapid Rise, Instant Yeast – This is what makes the dough rise and gives the rolls their light, pillowy texture. Instant yeast also helps keep the rising time relatively short.
- Granulated Sugar – Adds a gentle sweetness to the rolls and helps balance their buttery flavor.
- Salt – A small amount brings out the flavor of the bread and balances the sweetness from the sugar.
- Warm Milk – The milk adds richness and helps create a tender dough. Make sure it’s around 110 degrees as called for in the recipe.
- Butter – Softened butter goes directly into the dough, adding richness and helping give the rolls their soft texture.
- Egg – A room-temperature egg adds richness and structure to the dough and contributes to the rolls’ tender texture.
- Melted Butter – This is brushed over the rolls as soon as they come out of the oven, giving the tops a soft, buttery finish and beautiful sheen.
Step-by-Step Instructions
First, make the dough.
Combine 3 cups of flour, yeast, sugar, salt, warm milk, butter, and egg in the bowl of a stand mixer.
Attach the dough hook and turn the mixer on to the lowest speed and mix until flour is incorporated, scraping down the sides of the bowl as necessary.
Increase speed to medium and beat for 2 minutes.
Next, add the remaining flour.
Add 1/2 cup flour and blend with the dough hook until incorporated. And another 1/2 cup flour and repeat, mixing at medium speed for another 2 minutes until a ball of dough is formed.
Add additional flour as necessary. The dough should be slightly sticky and soft and pulling away from the edge of the bowl.
Let the dough rise.
Transfer the dough to a lightly greased bowl and cover with a towel or plastic wrap. Let rise for 30 minutes at room temperature.
Remove the towel or plastic wrap and deflate the dough by punching down lightly.
Shape the rolls.
Pinch off pieces of the dough and form 24 rolls. You can weigh them to keep the rolls close to the same size. Mine were about 2 ounces each but this will vary depending on how much flour you added.
Transfer the rolls to a lightly greased quarter baking sheet or 9 x 13 baking dish. Cover with a towel or plastic wrap and let rise for an additional 30 minutes at room temperature.
Finally, bake.
Preheat oven to 375 degrees. Bake the rolls for 12 to 15 minutes or until golden brown and cooked through. If the rolls are getting too brown, just tent the rolls with foil.
Remove rolls and brush hot rolls with the melted butter. Serve immediately or store cooled rolls in a plastic bag for up to 3 days.
Expert Tips
Pay attention to the milk temperature. The recipe calls for milk at 110 degrees, and that temperature matters when you’re working with yeast. If you have a kitchen thermometer, this is a good time to use it.
Let the dough tell you how much flour it needs. There’s a reason the recipe gives a range of 4 to 5 cups. You might not need every last bit. Look for dough that is soft and slightly sticky but pulls away from the sides of the mixing bowl.
Aim for evenly sized rolls. Similar-sized pieces will rise and bake more evenly. You can simply divide the dough by eye, or use a kitchen scale if you want them especially uniform.
Give the rolls room to rise. Don’t rush either 30-minute resting period. That rising time is an important part of creating their light, fluffy texture.
Keep an eye on the oven. Start checking the rolls around the lower end of the 12-to-15-minute baking window. If they’re already beautifully golden but need more time inside, loosely tent them with foil.
And don’t skip that last bit of melted butter. Brushing it over the rolls while they’re still hot gives the tops that lovely soft, buttery finish.
Recipe Variations
I’d keep the dough exactly as written and have fun with the rolls once they’re baked. They’re simple enough to work with both sweet and savory flavors.
For something savory, serve the warm rolls with garlic butter or an herb butter. For breakfast, split one open and add butter, honey, or your favorite jam. And if you have leftovers, these rolls are a great size for little sandwiches and sliders.
You can also keep things wonderfully simple. Warm rolls with nothing more than that melted-butter finish are hard to beat.

Storage & Reheating
These rolls are especially good warm from the oven, but they keep nicely for later, too. Store leftovers in an airtight container at room temperature for up to 4 days.
For longer storage, wrap the cooled rolls tightly in plastic wrap followed by foil, or place them in a freezer-safe airtight zip-top bag. They can be frozen for up to 3 months.
You can also get a head start the night before. Prepare the rolls up to the second rise, cover them, and refrigerate overnight. Take them out of the refrigerator an hour before you want to bake them and let them sit at room temperature. Then bake as directed.
When serving leftover rolls, warm them gently just until the centers are soft again. A little butter at the table doesn’t hurt, either.
Serving Suggestions
I love these rolls alongside the kinds of dinners that give you an excuse to tear one open and use it to catch every last bit of sauce or gravy. Think roasted chicken, turkey and gravy, pot roast, comforting casseroles, creamy soups, or a big bowl of stew.
They’re also right at home on a holiday table. Serve a warm basket with Thanksgiving dinner, Christmas dinner, or any gathering where freshly baked bread belongs in the middle of the table.
And don’t forget about the leftovers. Split the rolls for mini sandwiches, turn them into sliders, or warm one in the morning and serve it with butter and jam.
Recipe FAQs
1. Why didn’t my dinner rolls rise?
Make sure you’re using rapid rise, instant yeast and that the milk is around 110°F. If the milk is too hot, it can damage the yeast. Also, keep the dough covered at room temperature during both 30-minute rises.
2. How do I know if I’ve added enough flour?
The dough should be soft and slightly sticky, but it should start pulling away from the sides of the mixing bowl. You may not need the full 5 cups of flour, so add more only as necessary. Too much flour can make the rolls dense instead of soft and fluffy.
3. How can I make all 24 rolls the same size?
You can eyeball the portions, but a kitchen scale makes it much easier. Divide the dough into 24 pieces that are close to the same weight. They should be around 2 ounces each, although this can vary depending on how much flour you use.
4. Can I prepare the dinner rolls ahead of time?
Yes! Prepare and shape the rolls up until the second rise, then cover and refrigerate overnight. Take them out of the refrigerator 1 hour before baking and let them sit at room temperature. Then bake at 375°F for 12 to 15 minutes as directed.
5. How do I keep my dinner rolls from getting too brown?
If the tops are golden but the rolls still need more time to bake, simply tent them loosely with foil. This keeps the tops from browning too much while the centers finish baking. Once they’re done, brush the hot rolls with melted butter for that soft, buttery finish.


Easy Dinner Rolls
Ingredients
- 4-5 cup all purpose flour
- 2 tbsp rapid rise, instant yeast
- 1/3 cup granulated sugar
- Salt
- 1 1/2 warm milk, 110 degrees
- 5 tbsp butter, softened
- 1 Egg, room temperature
- 2 tbsp melted butter
Instructions
- Add 3 cups of the flour to the bowl of a stand mixer along with the yeast, sugar, salt, warm milk, softened butter, and egg.
- Fit the mixer with the dough hook. Mix on the lowest setting until the flour is worked into the wet ingredients, stopping to scrape the bowl when necessary. Turn the speed up to medium and continue mixing for 2 minutes.
- Mix in ½ cup flour. Once incorporated, add another ½ cup flour and continue mixing on medium for another 2 minutes, until the dough comes together into a ball.
- Add more of the remaining flour only as needed. The finished dough should remain soft and a little sticky while beginning to pull away from the sides of the mixing bowl.
- Place the dough in a lightly greased bowl. Cover it with a clean towel or plastic wrap and leave it at room temperature to rise for 30 minutes.
- Uncover the dough and gently punch it down to release the excess air. Divide and shape the dough into 24 rolls. For more evenly sized rolls, you can weigh the portions.
- Arrange the rolls in a lightly greased quarter sheet pan or 9 × 13-inch baking dish. Cover again and leave them at room temperature for another 30 minutes.
- Preheat the oven to 375°F. Bake for 12–15 minutes, until the rolls are golden and baked through. If the tops are browning too quickly, loosely cover them with foil.
- Take the rolls out of the oven and immediately brush the tops with the 2 tablespoons melted butter. Serve warm. Once cooled, the rolls can also be stored for later.
.
Recipe Notes
- Flour: Start with 4 cups of all-purpose flour and add more as needed, up to 5 cups. You want a soft, workable dough rather than one that feels overly dry.
- Milk temperature: Keep the milk around 110°F. Milk that is too hot can interfere with the yeast, while milk that is too cool can slow down the rise.
- Yeast: Make sure you’re using rapid rise, instant yeast as listed in the recipe. Using a different type of yeast may change the rising time.
- Butter: The 5 tablespoons of butter should be softened so it incorporates easily into the dough. Keep the additional 2 tablespoons melted butter for the step indicated in the original recipe.
- Egg: A room-temperature egg will incorporate into the dough more easily than a cold one.
- Rising: Give the dough the full 1 hour resting time listed in the recipe. The temperature of your kitchen can affect how quickly yeast dough rises.
Nutrition
Calories: 74kcal | Carbohydrates: 7g | Protein: 1g | Fat: 4g | Saturated Fat: 2g | Cholesterol: 17mg | Sodium: 136mg | Potassium: 37mg | Sugar: 3g | Vitamin A: 140IU | Calcium: 20mg | Iron: 0.3mg