Skip to content



Creamy, rich, and just the right size for one, these mini cheesecakes have everything I love
about classic cheesecake—without the work of making a full-size one.
Each little cheesecake starts with a buttery graham cracker crust and gets topped with a thick,
smooth filling that sets up beautifully in a standard muffin pan.
I especially love these for gatherings because there’s nothing to slice at serving time.
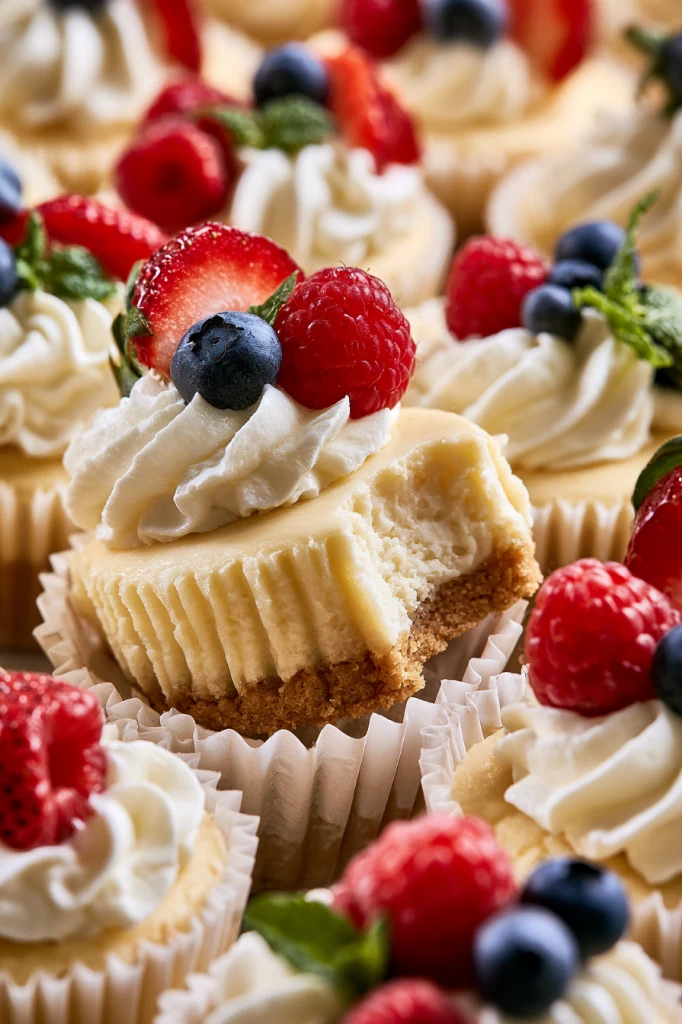
Set them out with fresh berries and whipped cream, drizzle them with caramel or chocolate,
or make a few different toppings so everyone can choose a favorite.
And because they need time to chill, they’re exactly the kind of dessert you can make ahead and forget about until it’s time to eat.
Mini Cheesecakes Ingredients
For the Graham Cracker Crust
- Graham Cracker Crumbs – These create the buttery, slightly crisp base for each mini cheesecake. You’ll need about 8 full-sheet graham crackers to make the crumbs.
- Granulated Sugar – A little sugar sweetens the crust and complements the graham cracker flavor.
- Unsalted Butter – Melted butter holds the crumbs together and gives the crust its rich, buttery texture.
For the Cheesecake Filling
- Cream Cheese – This is the heart of the cheesecake filling. Use full-fat brick cream cheese and bring it to room temperature so it blends into a smooth, creamy batter.
- Granulated Sugar – Sweetens the filling without overpowering the tangy cream cheese flavor.
- Sour Cream – Adds richness and helps give the cheesecakes their soft, creamy texture. Full-fat sour cream works best here.
- Vanilla Extract – Adds a warm vanilla flavor that rounds out the cheesecake filling.
- Lemon Juice – Just a small amount adds brightness and balances the richness of the cream cheese.
- Eggs – Give the filling structure so the cheesecakes set as they bake while remaining creamy. Add them one at a time and avoid over-mixing once they’re incorporated.
Step-by-Step Instructions
Let’s make mini cheesecakes! The process is simple: start with the graham cracker crust, mix the creamy filling, bake, and then give the cheesecakes plenty of time to chill.
First, prepare the pan and crust. Preheat the oven to 350°F (177°C) and line a standard 12-count muffin pan with cupcake liners. Combine all of the crust ingredients in a medium bowl. The mixture will be sandy. Firmly press a heaping Tablespoon of crust mixture into each liner, and bake the crusts for 6 minutes.
Next, make the filling. Using a handheld or stand mixer fitted with a paddle or whisk attachment, beat the cream cheese and granulated sugar together on medium-high speed in a large bowl until the mixture is completely smooth and creamy, about 2 minutes. Add the sour cream, lemon juice, and vanilla extract, and beat until fully combined.
With the mixer running on medium speed, add the eggs 1 at a time, beating just until combined before adding the next. Do not over-mix. Divide the batter among the liners, filling each all the way to the top. It’s OK if the crust is still warm.
If you’d like, add the optional water bath. Boil enough water to fill a large metal baking or roasting pan about 1 inch deep. Place the metal pan on the bottom rack of the preheated oven, pour in the boiling water, and immediately place the cheesecakes on the center rack. Close the oven to trap the steam inside. The muffin pan doesn’t sit in the water—the steam simply creates a more humid environment while the cheesecakes bake.

Now, bake. Bake until the edges are set and the centers slightly jiggle when you tap the pan, about 20 minutes.
Finally, cool and chill. Set the pan on a cooling rack and allow the cheesecakes to cool at room temperature for 45 minutes. Transfer them to the refrigerator and chill for at least 2 hours and up to 24 hours. Or, if you’re short on time, place them in the freezer for 1 hour. If chilling in the refrigerator for longer than 2 hours, loosely cover the cheesecakes.
Once they’re cold, they’re ready for the fun part: toppings!
Expert Tips
For such a simple little dessert, a few small details can make a big difference.
Use full-fat brick cream cheese. This gives the filling the structure and richness you want in baked cheesecake. For the most consistent results, don’t use the softer US-style cream cheese spread sold in tubs.
Bring the filling ingredients to room temperature. Soft cream cheese combines much more easily with the other ingredients, helping you get a smooth filling instead of one dotted with little lumps.
Get the cream cheese smooth before adding the eggs. Beat the cream cheese and sugar for the full 2 minutes, and make sure the mixture is creamy before moving on.
Don’t over-mix the eggs. Add them one at a time and mix only until incorporated. Once the eggs go in, less mixing is better.
Don’t wait for the centers to become completely firm in the oven. The cheesecakes are ready when the edges are set but the centers still have a slight jiggle. They’ll continue to set as they cool and chill.
And don’t worry if the centers sink a little. Some sinking is normal with cheesecake—and, conveniently, it leaves the perfect little spot for whipped cream, berries, or a spoonful of sauce.
Recipe Variations
The classic filling is one of my favorite things about these cheesecakes because you can take it in so many directions without changing the base recipe.
For something fresh and fruity, spoon strawberry, raspberry, or blueberry sauce over the chilled cheesecakes. Fresh berries and whipped cream are lovely, too, especially with a few mint leaves on top.
If you like something bright and tangy, add a spoonful of lemon curd. For a richer dessert, try salted caramel, chocolate ganache, or red wine chocolate ganache.
You can also make them extra small. Line a 24-count mini muffin pan with mini muffin liners, or grease it with nonstick spray or butter. Press 2 teaspoons of crust into each liner and pre-bake at 350°F (177°C) for 4 minutes. Fill with cheesecake batter and bake for 10–11 minutes, or until the tops appear set. This version makes approximately 30 super mini cheesecakes.
Storage & Reheating
These cheesecakes are a great make-ahead dessert. Once baked and chilled, cover any leftovers and keep them in the refrigerator for up to 5 days.
You can also prepare the cheesecakes through Step 3 2–3 days in advance. Cover the unbaked cheesecakes, refrigerate them, and continue with the optional water bath and baking instructions when you’re ready.
For longer storage, freeze the individual baked cheesecakes for up to 3 months. Let them thaw overnight in the refrigerator before serving.
There’s no need to reheat mini cheesecakes—they’re meant to be enjoyed chilled. If they’ve been frozen, simply give them enough time to thaw completely in the refrigerator.
Serving Suggestions
I love serving these mini cheesecakes cold from the refrigerator with a swirl of whipped cream, a handful of fresh berries, and a little mint. It’s simple, pretty, and lets the creamy cheesecake filling stay front and center.
For a party, try turning them into a mixed cheesecake platter. Top a few with salted caramel, some with chocolate ganache, and the rest with fruit sauce, lemon curd, or fresh berries and whipped cream. You’ll have several different-looking desserts from one batch, and everyone can reach for the topping they love most.
Or keep them completely plain. With that buttery graham cracker crust and thick, creamy filling, they really don’t need much else.
Why You’ll Love This Recipe
There’s a lot to love about making cheesecake this way. You still get that creamy center and buttery crumb crust, but everything comes together in 12 neat little portions.
- They’re easier than a full cheesecake. A standard muffin pan does all the work of creating individual servings, and there’s no slicing required.
- The texture is wonderfully creamy. Full-fat cream cheese and sour cream give the filling its rich, smooth consistency, while a little lemon juice keeps the flavor bright.
- They’re made for toppings. I love them with whipped cream and berries, but lemon curd, salted caramel, fruit sauce, or chocolate ganache are all delicious here.
- You can make them ahead. The cheesecakes need at least 2 hours to chill anyway, which makes them especially convenient when you’re planning dessert for a gathering.
- They freeze well, too. Once baked, they can be frozen for up to 3 months, so you can keep a few tucked away for another day.

Recipe FAQs
1. Do I really need to bring the cream cheese and eggs to room temperature?
Yes, I recommend it. Room-temperature cream cheese, sour cream, and eggs blend together much more easily and help create that smooth and creamy cheesecake filling. Cold cream cheese can leave little lumps in the batter.
2. How do I know when the mini cheesecakes are done?
The edges should look set, but the centers should still have a slight jiggle when you gently tap the pan. This should take about 20 minutes. Don’t wait until the centers are completely firm because the cheesecakes will continue to set as they cool and chill.
3. Why did my mini cheesecakes sink in the middle?
A little sinking is normal, so don’t worry if the centers dip slightly as they cool. To help prevent excess sinking, make sure you don’t over-mix the batter after adding the eggs. You can also use the optional water bath to add steam to the oven while they bake.
4. Do I have to use the water bath?
No, the water bath is completely optional. The cheesecakes will still bake without it. I like using it because the extra steam creates a humid baking environment and helps prevent the cheesecakes from sinking too much as they cool.
5. Can I make these mini cheesecakes ahead of time?
Yes, and that’s one of the reasons they’re so convenient. You can chill the baked cheesecakes for up to 24 hours before serving. You can also freeze individual baked cheesecakes for up to 3 months. Let them thaw overnight in the refrigerator before adding your favorite toppings and serving.
Mini Cheesecakes
Ingredients
Crust
- 1 cup (120g) graham cracker crumbs (about 8 full sheet graham crackers)
- 2 tbsp (25g) granulated sugar
- 3 tbsp (43g) unsalted butter, melted
Filling
- 16 ounces (452g) full-fat brick cream cheese, softened to room temperature
- 1/2 cup (100g) granulated sugar
- 1/4 cup (60g) full-fat sour cream, at room temperature
- 1 tbsp pure vanilla extract
- 1 tbsp freshly squeezed lemon juice
- 2 large eggs, at room temperature
Instructions
- Prepare the oven and pan. Preheat the oven to 350°F (177°C). Place cupcake liners in a standard 12-count muffin pan.
- Prepare the crusts. Stir all of the crust ingredients together in a medium bowl. The mixture will have a sandy consistency. Spoon a heaping Tablespoon into each liner and press it down firmly. Bake for 6 minutes.
- Mix the cheesecake filling. Using a handheld or stand mixer fitted with a paddle or whisk attachment, beat the cream cheese and granulated sugar in a large bowl on medium-high speed for about 2 minutes, until completely smooth and creamy. Add the sour cream, lemon juice, and vanilla extract and beat until fully incorporated. With the mixer running on medium speed, add the eggs one at a time, mixing only until each egg is incorporated before adding the next. Do not over-mix. Divide the filling among the liners, filling each one all the way to the top. The crusts can still be warm when you add the filling.
- Optional water bath. Bring a pot of water to a boil. You will need enough to create a 1-inch-deep layer of water in a roasting pan. Place a large metal baking or roasting pan on the bottom rack of the preheated oven; a 9×13-inch metal baking pan works well. Do not use glass. Carefully pour boiling water into the pan until it is about 1 inch deep. Immediately put the muffin pan of cheesecakes on the center oven rack and close the oven door so the steam remains inside. The muffin pan itself does not go into the water. This step is optional but helps reduce excessive sinking as the cheesecakes cool.
- Bake. Bake for about 20 minutes. They are ready when the edges look set but the centers still have a slight jiggle when the pan is gently tapped.
- Cool and chill. Transfer the muffin pan to a cooling rack and leave the cheesecakes at room temperature for 45 minutes. Refrigerate for at least 2 hours and up to 24 hours. Alternatively, chill them in the freezer for 1 hour to speed up the process. If refrigerating for longer than 2 hours, loosely cover them. A small amount of sinking during cooling is normal, including when the optional water-bath method is used.
- Add toppings. Once chilled, decorate the cheesecakes as desired. Whipped cream can be piped or spread over the tops, followed by berries, mint, or another preferred topping. Decorated cheesecakes can be prepared up to 24 hours ahead and kept refrigerated until serving.
- Store leftovers. Cover any remaining cheesecakes and refrigerate for up to 5 days.
.
Recipe Notes
- Make ahead: Prepare the cheesecakes through Step 3 up to 2–3 days before baking. Cover the unbaked cheesecakes, refrigerate, and continue with Step 4 when ready to bake. Baked individual cheesecakes can also be frozen for up to 3 months. Thaw them overnight in the refrigerator before serving.
- Topping ideas: Try salted caramel, lemon curd, strawberry topping, chocolate ganache, red wine chocolate ganache, fresh berries and mint, and/or homemade whipped cream.
- Super mini cheesecakes: Line a 24-count mini muffin pan with mini muffin liners, or grease it with nonstick spray or butter. Liners make removal easier. Prepare the crust and filling as directed above. Press 2 teaspoons of crust mixture into each mini muffin liner. Pre-bake at 350°F (177°C) for 4 minutes. Remove from the oven, add the cheesecake filling, and bake for 10–11 minutes, or until the tops appear set. Continue with the cooling and chilling directions in Step 6. This version yields approximately 30 super mini cheesecakes.
- Digestive biscuit alternative: If graham crackers are unavailable, make the crust with 1 cup (105g) digestive biscuit crumbs (7 biscuits), 30g butter, melted, and 2 Tablespoons (25g) sugar. Grind the biscuits into crumbs, combine them with the sugar, and stir in the melted butter. Press the mixture into the liners and pre-bake according to Step 2.
- Cream cheese outside the US: Some varieties of spreadable cream cheese sold outside the US are thicker and firmer than typical US tub-style cream cheese and may work for cheesecake. For the most predictable result, use a firm, full-fat cream cheese.
Nutrition
Serving: 1 mini cheesecake Calories: 264kcal | Carbohydrates: 21g | Protein: 4g | Fat: 19g | Saturated Fat: 10g | Cholesterol: 83mg | Sodium: 198mg | Potassium: 87mg | Fiber: 0.3g | Sugar: 15g | Vitamin A: 625IU | Vitamin C: 0.1mg | Calcium: 51mg | Iron: 0.6mg Nutrition values are estimates and can vary depending on the specific brands of ingredients used and any added toppings.You May also Love these recipes from my list of best desserts i make over and over
Better Than a Boyfriend Brownies
The Ultimate Lemon Sugar Cookies
The Ultimate Chocolate Chip Cookie Recipe
Soft & Chewy Snickerdoodle Cookies
Brown Butter Brown Sugar Cookies
If you tried this recipe, i would love hearing your feedback, please leave a comment to let me know how the recipe came out for you.