Skip to content

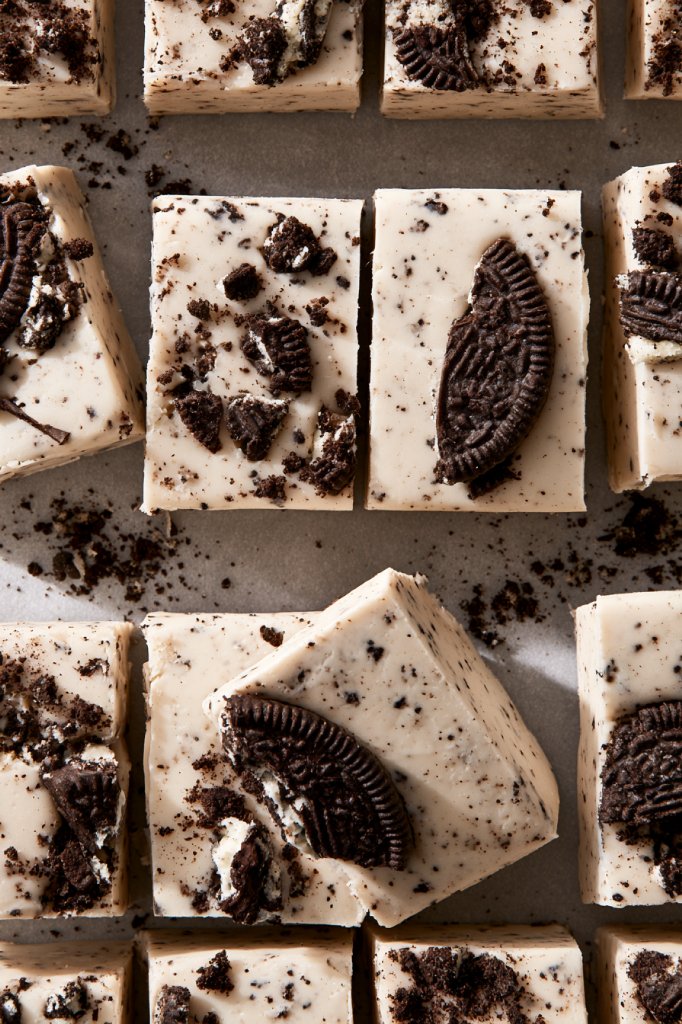
If you love the combination of creamy white chocolate and crunchy Oreos,
this easy Oreo fudge is the kind of treat you’ll want to keep in your back pocket.
It comes together in just a few minutes, then all that’s left to do is let it set before cutting it into little squares.
Why You’ll Love This Recipe
There’s something especially satisfying about homemade fudge when it doesn’t require a long list of ingredients or a candy thermometer. This Oreo fudge keeps things wonderfully simple: a creamy white chocolate base, plenty of chopped Oreos, and a little vanilla and salt to round everything out.
The best part is how quickly the mixture comes together in the microwave. Make a batch for a holiday dessert tray, bring it to a gathering, or keep a container on the counter for whenever you’re craving something sweet.
For Oreo Fudge
- Sweetened Condensed Milk – this creates the rich, creamy base of the fudge and helps give it that smooth, soft texture.
- White Chocolate Chips – these melt into the condensed milk to create the sweet, creamy fudge base. For the best texture and flavor, use good-quality white chocolate chips.
- Oreos – these are the star of the recipe! Chop 10 Oreos and mix them throughout the fudge, then use a few additional broken Oreos on top for extra cookie flavor and a little crunch.
- Salt – just a small amount helps balance the sweetness of the white chocolate and condensed milk.
- Vanilla Extract – this adds a touch of warmth and enhances the overall flavor of the fudge.
Let’s Make Oreo Fudge!
This is one of those recipes where the hardest part is waiting for the fudge to set. Start by lining your pan, then combine the condensed milk and white chocolate chips in a microwave-safe bowl.
The mixture only needs 1 minute in the microwave. After that, give it a good stir—the chocolate will continue melting as you mix. Once smooth, fold in the chopped Oreos, salt, and vanilla.
Spread everything into the prepared pan, add a few extra Oreo pieces on top if you like, and let the fudge rest on the counter until firm.
Step-by-Step Instructions
- Line a square 8 or 9 inch baking dish with aluminum foil. Make sure the foil goes up the sides of the pan. Set aside.
- In a glass microwave safe bowl, combine the sweetened condensed milk and white chocolate chips. Stir with a spatula until combined.
- Microwave on full power for 1 minute. Do not microwave longer, the mixture will melt and come together as you stir. Stir until the chocolate chips are melted and combined. Over microwaving can cause the chocolate to scorch and the fudge will be crumbly. Stir in the chopped oreos, salt, and vanilla extract.
- Transfer the fudge to the pan and spread into an even thickness. Press extra oreos into the top if desired. Allow the fudge to set on the counter for at least 4 hours, overnight is great too. You can loosely cover the top of the fudge with foil.
- Once the fudge is set, cut into squares. Store in an airtight container on the counter for up to 1-2 weeks.
Expert Tips
The most important thing to remember with this recipe is not to overheat the chocolate mixture. The one-minute microwave time is intentional. Even if the chocolate doesn’t look completely melted when you first take it out, keep stirring rather than putting it back in the microwave.
For the easiest removal, make sure the aluminum foil comes all the way up the sides of the pan. And give the fudge plenty of time to firm up before slicing—it will be much easier to cut neatly once it has completely set.
Recipe Variations
Once you have the basic Oreo fudge down, it’s easy to give it a seasonal twist.
Mint Oreo fudge: Add 1/4 tsp mint or peppermint extract for a cool, refreshing flavor.
Peanut butter Oreo fudge: Add 1/4 cup peanut butter while melting the chocolate chips and sweetened condensed milk.
Different Oreo flavors: Swap in your favorite Oreo variety or combine two different flavors.
Holiday Oreo fudge: Add red or green gel food coloring for a festive look.
Sprinkle Oreo fudge: Stir Christmas sprinkles into the mixture for a little extra holiday color.
Storage & Reheating
Keep the finished fudge in an airtight container on the counter for up to 1-2 weeks.
You can also freeze the fudge for up to 3 months. Wrap it tightly in plastic wrap and place it inside a zip-top freezer bag. When you’re ready to enjoy it, thaw the fudge in the refrigerator for 24 hours.
There’s no need to reheat this fudge—it’s best enjoyed once it has completely thawed and returned to its naturally firm, creamy texture.
What to Serve with Oreo Fudge
This fudge is sweet and rich enough to stand on its own, so a small square alongside a cup of coffee or tea makes an easy afternoon treat. It’s also right at home on a holiday cookie platter with other homemade sweets.
For parties and gatherings, arrange the squares on a dessert board or platter and add a few extra Oreo pieces around them for a simple cookies-and-cream theme.
And if you’re making a holiday dessert assortment, these little squares are especially nice because you can prepare them ahead of time and have them ready when you need them.

Recipe FAQs
1. Why is my Oreo fudge dry and crumbly?
This usually happens when the chocolate and sweetened condensed milk mixture gets overheated. You only want to microwave it for 1 minute. Even if the chocolate doesn’t look completely melted when you take it out, keep stirring and it should melt together from the heat. Adding extra microwave time can cause the fudge to scorch and become dry and crumbly.
2. What should I do if the white chocolate chips aren’t completely melted?
No need to put the mixture back in the microwave right away. Keep stirring with a spatula, as the chocolate will continue to melt from the heat of the mixture. This is one of those recipes where a little patience while stirring makes all the difference.
3. Do I need to refrigerate Oreo fudge while it sets?
No, I recommend letting the fudge set on the counter. It needs at least 4 hours to firm up, although leaving it overnight works great too. Allowing it to cool gradually helps the fudge develop a smooth texture.
4. Can I freeze Oreo fudge?
Yes, you can definitely freeze this fudge. Wrap it tightly in plastic wrap and place it in a zip-top freezer bag. It will keep in the freezer for up to 3 months. When you’re ready to enjoy it, thaw the fudge in the refrigerator for 24 hours.
5. How can I get clean, even squares when cutting the fudge?
Make sure the fudge is completely set before you start cutting. I recommend using a sharp knife and taking your time to make even cuts. Lining the baking dish with aluminum foil also makes it much easier to lift the entire slab out of the pan before slicing.
You May Also Love
From cozy classics to indulgent new favorites, these are the desserts our readers can’t stop making!
The Ultimate Chocolate Chip Cookie Recipe
Soft & Chewy Snickerdoodle Cookies
Brown Butter Brown Sugar Cookies
Quick and Easy Cinnamon Swirl Bread Recipe

Oreo Fudge
Ingredients
- 1 can sweetened condensed milk, 14 oz
- 2 3/4 cup (468g) white chocolate chips, this is probably 1.5 bags, be sure to measure though!
- 10 oreos, chopped, plus a few additional broken oreos for the top of the fudge
- 1/8 tsp salt
- 1/2 tsp vanilla extract
Instructions
- Line a square 8 or 9 inch baking dish with aluminum foil. Make sure the foil goes up the sides of the pan. Set aside.
- In a glass microwave safe bowl, combine the sweetened condensed milk and white chocolate chips. Stir with a spatula until combined.
- Microwave on full power for 1 minute. Do not microwave longer, the mixture will melt and come together as you stir. Stir until the chocolate chips are melted and combined. Over microwaving can cause the chocolate to scorch and the fudge will be crumbly. Stir in the chopped oreos, salt, and vanilla extract.
- Transfer the fudge to the pan and spread into an even thickness. Press extra oreos into the top if desired. Allow the fudge to set on the counter for at least 4 hours, overnight is great too. You can loosely cover the top of the fudge with foil.
- Once the fudge is set, cut into squares. Store in an airtight container on the counter for up to 1-2 weeks.
.
Recipe Notes
Nutrition Facts per serving (1 piece, based on 25 servings):
Calories: 174kcal | Carbohydrates: 24g | Protein: 2g | Fat: 9g | Saturated Fat: 6g | Cholesterol: 19mg | Sodium: 36mg | Potassium: 70mg | Fiber: 1g | Sugar: 18g | Calcium: 61mg | Iron: 0.4mg Nutrition values are approximate and can vary depending on the specific brands of sweetened condensed milk, white chocolate chips, and Oreos used.